PEmicro's ICD32Z for Windows is a powerful code debugging tool. It uses the Background Debug Mode (BDM) of an 683xx processor through one of PEmicro's hardware interfaces to give the user access to all on-chip resources. ICD32Z is a great tool for creating repeatable test, calibration and debugging procedures.
Features
Full-speed in-circuit emulation
Breakpoints with counters on the Nth execution
Variables window showing bytes, words, strings, and long words
Realtime execution as well as multiple tracing modes
Startup and Macro files for automating the debug process
Context-sensitive help for all commands
Timing measurement and execution count functions
Support for symbolic register files
Full assembly souce-level debugging
Includes ELF /DWARF 2.0 support for C source-level debugging
Supported Devices
There are several versions of the ICD debugger software. Each version supports different MCU architectures. This version supports NXP 683xx processors.
Easy setup and use
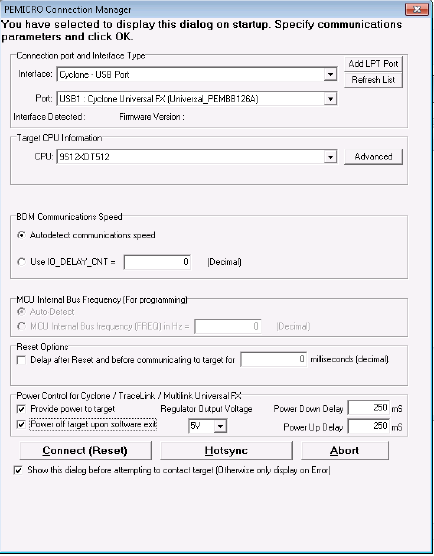
Connection Manager
ICD's Connection Manager facilitates setup configuration and connection to the target device via a debug probe or other compatible interface.
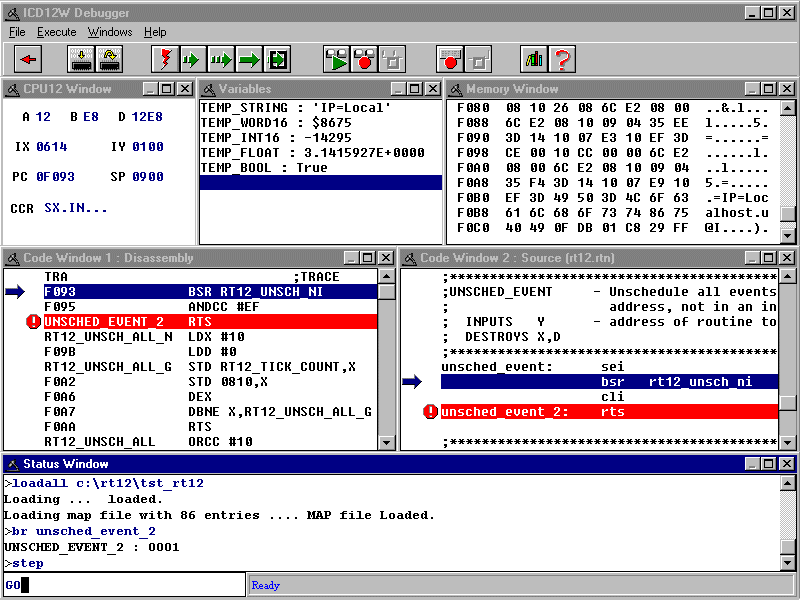
User Interface
The ICD interface is presented as a collection of windows, each performing a different function in the debugging process.
Debugger Software Overview
Status window - keyboard command prompt
Code window - displays disassembled machine code or the user's source code
Variable window - displays the value of application variables
Memory window - allows the user to view and change the memory allocation
CPU window - shows the current state of the registers
Register interpreter - enables modification of bit fields within the peripheral registers of the processor.
Source level debugging
As soon as a valid allocation file (generated by the command line assembler) is loaded into the ICD via the LOADMAP or LOADALL command, source level debugging is activated. If the PC is in a location for which source code is available, the source code is displayed in the code window. The user can set a breakpoint by using the BR command or by clicking on the appropriate line in the code window, then right-clicking and selecting "Toggle a Breakpoint".
F.A.Q.
I am using a C compiler and the PEmicro debug software. What kind of debug file format does the PEmicro Debugger software accept?
PEmicro recommends debugging with the ELF/DWARF2.0 format, as it is a common, standardized format in the embedded systems industry.
< h5class="btn btn-link collapsed" data-toggle="collapse" data-target="#collapse-2-bea5304ba99d430bbe6414cb4370f594" aria-expanded="false" aria-controls="collapse"> When I use the Multlink with the appropriate software, I get an $8882 error every time the software tries to update the firmware. However, this setup used to work with older Multilinks?
There are several hardware revisions of the Multilink. Newer revisions require newer software. If you are using a newer Multilink with older software, the software will not know how to update the new revision firmware. So the process keeps failing with error message $8882. Please install the latest Multilink Universal Resources and try to force a firmware update on your hardware.
We still recommend that you update your software to a version that has been extensively tested with your new multilink.
If using the Eclipse ARM or PPCNEXUS plugin, you should go to the Help -> Check for Updates menu in Eclipse and download the latest plugin from our website or from PEMicro's website.
If you are using any of the PROG, ICD, PKG, or UNIT software, you must purchase a new license for that software to obtain the latest version. You can purchase a new license online.
Free software upgrades are offered within 1 year from the date of purchase.
The Connection Wizard dialog box shows that my Multilink or Cyclone is not recognized even though I have connected the hardware to my USB port?
The connection wizard cannot detect the PEmicro hardware. First, make sure the USB Multilink or Cyclone hardware is connected to the PC with a USB cable. In this case, plug and unplug the USB cable and click Refresh in the connection wizard. The second step is to make sure that the multilink is not being used in any other software. If you still don't see the hardware, check out the following workarounds:
(A) Re-enable the USB driver
If you connected the Multilink/Cyclone interface before installing the drivers, Windows could not find the appropriate driver and may have disabled the device. On the multilink this means that the blue LED does not light up. If you unplug the device and plug it back in, Windows will automatically disable it even if you installed the drivers. To force Windows to reload the driver, do the following while the USB interface is connected to the computer:
1.) Open the Control Panel (Start button->Settings->Control Panel) 2.) Double-click the "System" icon. 3.) Select the "Hardware" tab . 4.) Click on the "Device Manager" button. 5.) The Jungo category should appear there. Expand the Jungo tree. Depending on your Windows version, two devices will appear. In Windows 8 and below you should only see "WinDriver". In Windows 10 and newer, you should only see "pemicrowindrvr". Then you should see "USB Multilink 2.0" or "Cyclone/TraceLink". You may have a warning (yellow exclamation mark) next to it. Double-click this device. 6.) Click the "Reinstall Driver..." button and follow the prompts to let Windows install the driver automatically.
(B) Reinstall the USB driver If either device does not show up in Device Manager, download and run the driver installation package appropriate for your version of Windows (attached to these FAQs).
(C) Uninstall old USB drivers If you have multiple driver versions on your PC, Windows may be loading an old driver version that is incompatible. For example, this can occur if you have updated Windows.
For Windows 10 x64 users, follow these steps to remove the old drivers:
1.) Open a command prompt (you may need administrator rights) and list all installed driver packages in a text file:
pnputil.exe /enum-drivers > pemicro.txt
2.) Remove all inf files for windrvr6.inf. In the text file, look for all drivers whose "original name" is windrvr6.inf. For example, you may see the following example:
Released Name: oem163.inf Original Name: windrvr6.inf Provider Name: Jungo Connectivity Class Name: Jungo Class GUID: {c671678c-82c1-43f3-d700-0049433e9a4b}< br>Driver version: 2013-09-23 11.4.0.0 Signer name: Jungo LTD You should remove it with the following command:
(D) Scan for hardware changes If you've tried the above workarounds and the problem is still not resolved, let's try to force Windows to reinitialize the connected USB interface. Leave the USB device connected.
1.) Open the Control Panel (Start button->Settings->Control Panel) 2.) Double-click the "System" icon. 3.) Select the "Hardware" tab . 4.) Click the Device Manager button. 5.) Expand the Jungo tree. Right-click on "WinDriver" or "pemicrowindrvr" and select Uninstall driver (check the box to delete the "The driver software for this device" if any). 6.) Go to the toolbar and click Action -> Check for hardware changes. 7.) Repeat this process for all other drivers such as "USB Multilink 2.0", "Cyclone/Tracelink" or "PEmicro OpenSDA Driver" Thess
Where and how do I get the latest version of PEmicro's software, algorithms, utilities or plug-ins?
Algorithm You can always download the latest internal and external algorithms from the PEmicro website. To do this, go to the support page -> Flash Programming Algorithms and select the "Download" link for the chip architecture for which you want to get new algorithms. Use the Flash List link to see the entire list of algorithms with the current version and date.
GDB Plugins To get the latest version of ARM and Power GDB Plugin, you can go to the corresponding Eclipse IDE. 1) Go to Help Menu -> Install New Software... and click on the "Available Software Sites" link. 2) If the PEMicro plugin was already present, make sure to check the box at PEMicro and click the OK button. 3) Go back to the "Help" menu -> "Search Update" and the IDE will automatically download the latest version from our update site.
Cyclone Utilities and PROG for Cyclone All Cyclone software is free to download. You can download the latest Cyclone resources from PEmicro's website, which will update all utilities and software, including algorithms, Image Creation Utility, CSAP, PROG for Cyclone and our documentation.
PROG, ICD, PKG, UNIT software If you have purchased licensed software, your installation code is proof that you are authorized to use the software and receive any upgrades received to which you may be entitled. You will need your installation code if you want to reinstall the software. The license is valid for one user or for one Multilink/Cyclone (Debugger Software). This means that the license is tied to an account. So keep your installation code safe and do not share it with others. Sharing installation codes may invalidate your license and lose your entitlements.
One year of software update is included in the purchase price for new licenses. You are entitled to any software upgrades to the product you have licensed that are released within one year of purchase.
When the year expires, your installation code will no longer work with new software versions.If you purchase a new license within two years of the original software purchase we will give you a 50% discount. Please include the invoice/order number of your original purchase in the order notes for this discount. After two years you will have to pay the full price. Even if your license expires, your current software will continue to work and you can use des Multilink with the existing software version on any PC.
How can I activate my PEmicro software?
Please read the PEmicro Software Activation Guide pdf linked below under Documentations.
.
Entering an installation code will result in a registration code that is unique to each Multilink or Cyclone. You cannot use the same registration code or activation code on different devices.
We have purchased software as part of our order, how can I download this software?
Download purchased software
To download purchased software, go to pemicro.com and click My Account (login required). Then select My Downloads from the options offered.
Even if the license has not been transferred to you, as long as you have the installation code, you can use the Search for installation code box to find the appropriate software.
Find the appropriate software and click Download Software to download it.
Note: If you already have an older version of the software on your system before installing the software, please uninstall the existing software using "Add/Remove Programs" on your PC.
Once the software has downloaded, run it to install following the installation instructions.
Transferring a license
If you want to transfer a license to someone else, go to pemicro.com and click My Account (login required). Then select My Product Licenses from the options offered.
Locate your software in the list and click Transfer license to someone else. On this page, you can also view the license or download the software.
Why do I see the power dialog warning when I try to debug or flash my chip in PROG, ICD, UNIT or third party software like Codewarrior?
The affected architectures are HCS08, RS08 and CFV1. Most customers facing this issue are using Multilink [FX] or USB-ML-12 (deprecated) hardware interfaces on a blank HCS08 target. Also users using Multilink FX, Cyclone [LC/FX] Universal or Cyclone PRO (discontinued) may see this dialog if they have disabled the option to power the target. The reason for showing the Power supply dialogs is that the PEmicro interface has difficulty entering debug mode. Typically, the problem is due to factors in the following order:
1) You're trying to connect to a chip that doesn't have any code stored in flash, and when the chip boots up, it's stuck in a reset state forever. This usually happens with users trying to program a new chip from the factory, or the chip was recently erased and the power supply switched.
2) The chip does not have its own RESET line, so the PEmicro interface cannot prevent the chip from going into the reset state. On some chips, the RESET line is shared with a GPIO pin, and outside of the reset state, the GPIO may have priority. If the chip has its own RESET line, a software RESET can switch the PEmicro interface to debug mode by toggling the BKGD line.
3) Your PEmicro hardware interface is unable or set to be unable to supply power to your target. If the PEmicro interface were capable of powering the chip, it would attempt to hold the BKGD line low and perform a hard RESET by putting the chip into power-on-reset (POR). This prevents the chip from entering the reset state. Users who have the Multilink Universal FX, Cyclone Pro, Cyclone Universal, or Cyclone Universal FX should enable the option to power the target to prevent this issue from occurring.
.
When the power dialog appears, the PEmicro interface is holding down the BKGD line and wants the user to manually power the board, which should prevent the chip from booting into the reset state. Even with all factors taken care of, the user may see the power dialog if the first attempt to enter debug mode failed. This could be due to hardware, software or firmware issues. Please check your connections and make sure your software and firmware support the chip you are trying to debug.
The power supply dialog can slow down your production line, and you may want to avoid the hassle of manually turning off the board. The first two factors can't be avoided. Fresh chips from the factory always have this problem. The third factor could be avoided if you had the right hardware and set it up to power the target. Especially for users with multilinks trying to flash on a production line, switching to a Cyclone hardware interface would be ideal to not only avoid this problem, but also eliminate the need for a computer due to the Cyclone's standalone programming capability.


.jpg)
.jpg)
.jpg)
.jpg)

 User Interface